JSON(JavaScript Object Notation)是一种轻量级的数据交换格式,目前在网络交互过程中有着举足轻重的地位如果您对json还有什么不清楚的话建议去看json百度百科。
在iOS平台上,Apple 从 iOS 5.0 才开始提供原生的json生成和解析的API,使用起来 非常方便,但这样就无法为iOS 5.0 之前版本的用户服务了。对于iOS 5.0以前的系统,json的使用得益于无数无私的开源拥护者的贡献。估计大多数开发者现在还不会直接抛弃仍在使用 5.0 以前版本的用户,所以这里优先介绍3种主要的开源库的使用,然后再介绍新的原生API的使用。
测试数据我们使用国家气象局提供的天气预报接口:
http://m.weather.com.cn/data/101010100.html
http://www.weather.com.cn/data/cityinfo/101010100.html
http://www.weather.com.cn/data/sk/101010100.html
您可以用浏览器打开,看看这三个地址到底是什么--其实你可以分别看到3个字符串,没错,你才对了,这就是我们测试用的 json 数据。
我们打开 github 搜索关键字 json ,程序语言选择 Objective-C ;可以得到 n 页结果。我们就依次介绍最前面的3个:stig/json-framework、TouchCode/TouchJSON、johnezang/JSONKit。紧接着介绍 iOS 5.0 开始提供的原生 JSON 处理类。
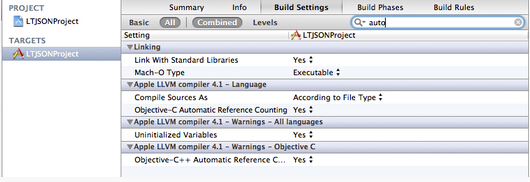
此处我们将这三个开源库及原生JSON处理类放到一个工程里介绍了,但开源库 stig/json-framework 编译是需要ARC支持的,而TouchCode/TouchJSON 和 johnezang/JSONKit 是不需要 ARC 支持。这样我么在工程中就需要打开 ARC (可以在创建工程的时候就选中 ARC,也可和下图一样在build setting 中设置两处 为 YES)
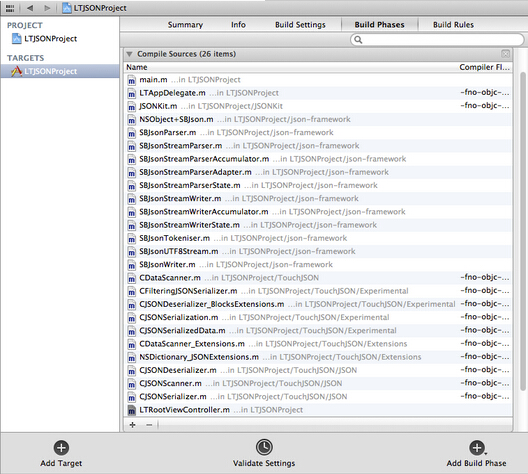
然后对后两者在编译规则中做简单的处理,-fno-objc-arc即是规定该文件编译时不需要ARC支持,如下图:
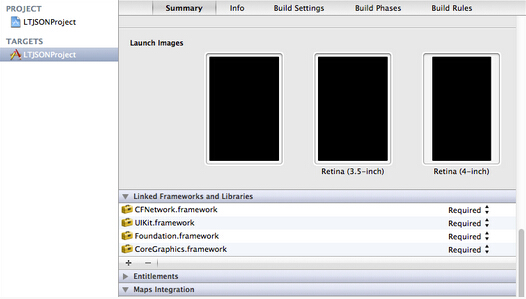
因为我们测试的数据来自于互联网,所以我们需要网络支持,这里我们需要添加系统库:CFNetwork.framework,如下图
终于开始写代码了,公用代码:
1.将url地址定义成字符串常量
2.import 相应文件;
3.连接到测试的url;
4.取得json数据,并将其以字符串的形式显示在第一个 TextView 上;
5.将解析后的JSON实际内容显示在第二个 TextView 上
//为了方便,先在工程中的 .pch 文件中定义 字符串常量
#define jsonSourceURLAddress_1 @"http://m.weather.com.cn/data/101010100.html"
#define jsonSourceURLAddress_2 @"http://www.weather.com.cn/data/sk/101010100.html"
#define jsonSourceURLAddress_3 @"http://www.weather.com.cn/data/cityinfo/101010100.html
#import "LTRootViewController.h"
//测试工程中 3 中方式都是在这个controller中使用,将需要的import进来
#import "SBJson.h"
#import "TouchJSON/JSON/CJSONDeserializer.h"
#import "JSONKit/JSONKit.h"
- (void)viewDidLoad
{
[super viewDidLoad];
//向开源的地址发送连接请求
//这里使用的是异步的请求
NSURL *url = [NSURL URLWithString:jsonSourceURLAddress_1];
NSURLRequest *urlRequest = [NSURLRequest requestWithURL:url cachePolicy:NSURLRequestReturnCacheDataElseLoad timeoutInterval:30];
NSURLConnection *urlConnection = [NSURLConnection connectionWithRequest:urlRequest delegate:self];
[urlConnection start];
}
#pragma mark - NSURLConnectionDataDelegate methods
- (void)connection:(NSURLConnection *)connection didFailWithError:(NSError *)error
{
UIAlertView * alertV = [[UIAlertView alloc] initWithTitle:@"网络连接失败" message:[NSString stringWithFormat:@"%@",error] delegate:self cancelButtonTitle:nil otherButtonTitles:nil, nil];
[alertV show];
}
- (void)connection:(NSURLConnection *)connection didReceiveData:(NSData *)data
{
//这里我们终于拿到了网络返回的 JSON 数据 data
self.m_JsonData = data;
self.m_sourceJsonTV.text = [[NSString alloc] initWithData:data encoding:NSUTF8StringEncoding];
}
- (void)displayWithParsedDic:(NSDictionary *)rootDic
{
//rootDic 来自与我们所用的各种方式将 JSON 解析后得到的字典
//下面用于在 TextView 中显示解析成功的JSON实际内容
if (!rootDic) {
self.m_parsedJsonTV.text = @"cleaned...";
}else{
NSDictionary *weatherInfo = [rootDic objectForKey:@"weatherinfo"];
//由于字典中内容太多,我们只显示了一部分,诸如 temp2,temp3,...我们木有在这一一显示
self.m_parsedJsonTV.text = [NSString stringWithFormat:@"今天是 %@ %@ %@ 的天气状况是:%@ %@ ",[weatherInfo objectForKey:@"date_y"],[weatherInfo objectForKey:@"week"],[weatherInfo objectForKey:@"city"], [weatherInfo objectForKey:@"weather1"], [weatherInfo objectForKey:@"temp1"]];
}
}
现在分类的介绍这4种JSON解析方式:
1、json-framework
也有人管这库叫SBJson我们从 github 上下载 json-framework这个库并将其导入到我们的工程中(仅需将下载下来的文件夹中,classes 目录下的所有文件复制导入到我们的工程就行)。在任何你需要使用json处 :#import "SBJson.h"
- (IBAction)sbjsonAction:(id)sender {
//此处是使用 json-framework (SBJSON)解析,得到解析后存入字典:rootDic,并显示
SBJsonParser * parser = [[SBJsonParser alloc] init];
NSString * jsonStr = [[NSString alloc] initWithData:self.m_JsonData encoding:NSUTF8StringEncoding];
NSDictionary *rootDic = [parser objectWithString:jsonStr];
[self displayWithParsedDic:rootDic];
}
2、TouchJSON
我纠结了很久,要不要介绍这个库了,因为作者在github上声称:"But you should NOT be using this code in your new projects"。
我们从 github 上下载 TouchCode/TouchJSON 这个库并将其导入到我们的工程中(仅需将下载下来的文件夹中,Source 目录下的所有文件复制导入到我们的工程)。但是 Source/Experimental目录下提供的功能慎用( Be aware that the code in the Experimental subdirectory of Source is just that and may not have been extensively tested and/or have extra dependencies)。在任何你需要使用json处:#import "CJSONDeserializer.h"
- (IBAction)touchJsonAction:(id)sender {
//此处是使用 TouchJSON 解析,得到解析后存入字典:rootDic,并显示
NSError * error = nil;//error 用来存储解析过程中可能出现的错误信息
NSDictionary *rootDic = [[CJSONDeserializer deserializer] deserialize:self.m_JsonData error:&error];
[self displayWithParsedDic:rootDic];
}
3、JSONKit
我们从 github 上下载 johnezang/JSONKit 这个库并将其导入到我们的工程中(这个很简单,代码文件只有2个,都复制导入我们的工程吧)。
- (IBAction)jsonkitAction:(id)sender {
//此处是使用 JSONKit 解析,得到解析后存入字典:rootDic,并显示
NSDictionary * rootDic = [self.m_JsonData objectFromJSONDataWithParseOptions:JKParseOptionLooseUnicode];
[self displayWithParsedDic:rootDic];
}
4、原生JSON处理类
使用原生的JSON处理类解析就相当方便了,据说也是最快的(未亲测速度):
- (IBAction)nsjsonAction:(id)sender {
//此处是使用原生的 JSON 处理类解析,得到解析后存入字典:rootDic,并显示
NSError *error = nil;
NSDictionary * rootDic = [NSJSONSerialization JSONObjectWithData:self.m_JsonData options:NSJSONReadingMutableLeaves error:&error];
[self displayWithParsedDic:rootDic];
}
小结:这里只是介绍了最简单的通过网络得到JSON并解析之的方法。在实际应用中我们可能还要主意在解析时,根据实际传输的数据需要设置的 option 类型。由于本人的水平有限,如果有错我还请各位拍砖,并点出来我一定第一时间更正。
